A double-clicking mouse is more than just a nuisance. It can disrupt your gaming sessions and lead to misclicks.
But before you toss your annoying double-clicking mouse into the trash and invest in a new one, try these fixes and see if you can squeeze a couple more years out of your device.
How to Fix Double-Clicking
If your mouse starts to double-click, all is not lost as there are various fixes and workarounds to this problem.
Update Double Click Settings
The first thing you should do is to change Folder settings in Windows Explorer.
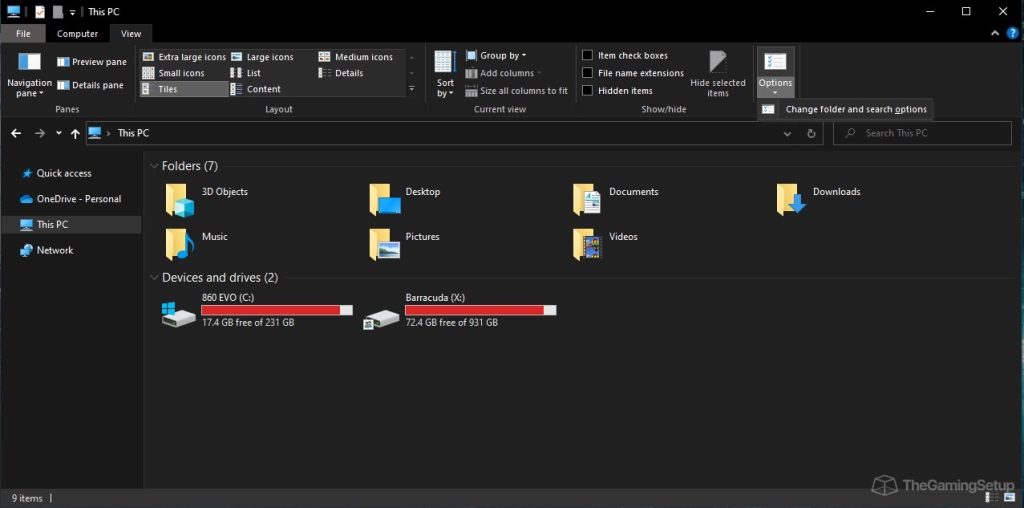
- Open Windows Explorer and head over to the View tab on top.
- Click on the Options button at the far right, which will open a small drop-down menu. Click on the “Change folder and search options.” In Windows 11, click the three-dot button and then click Options.
- This will open a small window called Folder options. In the General tab, in the middle, you’ll find the “Click items as follows” section. Make sure that the “Double-click to open an item (single-click to select)” option is selected.
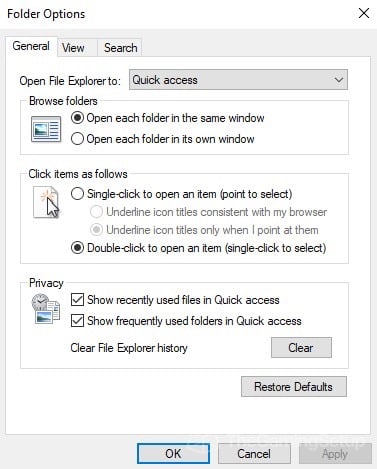
- Press OK and if your double-click issue was caused by that setting, it should be fixed now.
This problem can also occur if someone accidentally changes the basic mouse settings.
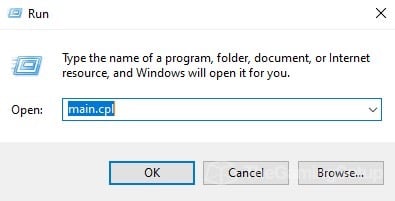
- In Windows 10 and 11, press the “Win+R” shortcut on your keyboard to open the Run command.
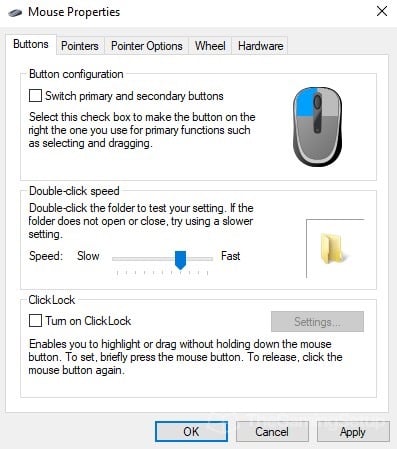
- Type “Main.cpl” into the run command box and press enter to open mouse properties.
- In the button tab, you can change the double-click speed according to your preference. If this is set too low, then Windows might register two different single clicks as one double click. You can experiment with the folder icon to check if the click speed is right for you.
Wireless Interference and Low Battery
For wireless mice, connectivity and power can be the culprit. First, check that your mouse is fully charged and not running low on juice. Plug it in for a couple of hours and then check if the double-click issue persists or not.
If your mouse uses batteries, replace them with new ones or recharge the batteries if they’re rechargeable. Mice that are running low on power can tend to misbehave.
Similarly, if the wireless connection between your mouse and your computer is weak or there is a disturbance in the connection, your mouse might double-click and even stutter when you move it around your screen.
Try to move your mouse closer to its wireless receiver to improve the connection. Also, make sure that there aren’t any metallic materials that might interfere with the wireless signal.
If you have a wired mouse, there won’t be any connectivity or battery issues, but the signal can still be compromised. To improve the signal, if you’ve connected the mouse to a USB hub or extender, try plugging it directly into the computer. To rule out faulty USB ports, try to change the port in which you plug your mouse into. This can also be applied to wireless mouse dongles.
Bad Mouse Drivers
Occasionally, your device drivers can get corrupted, which can cause your devices to not function properly. If this happens with your mouse, you can fix the drivers by uninstalling them and then restarting your PC. Upon restarting, Windows will automatically install the correct drivers.
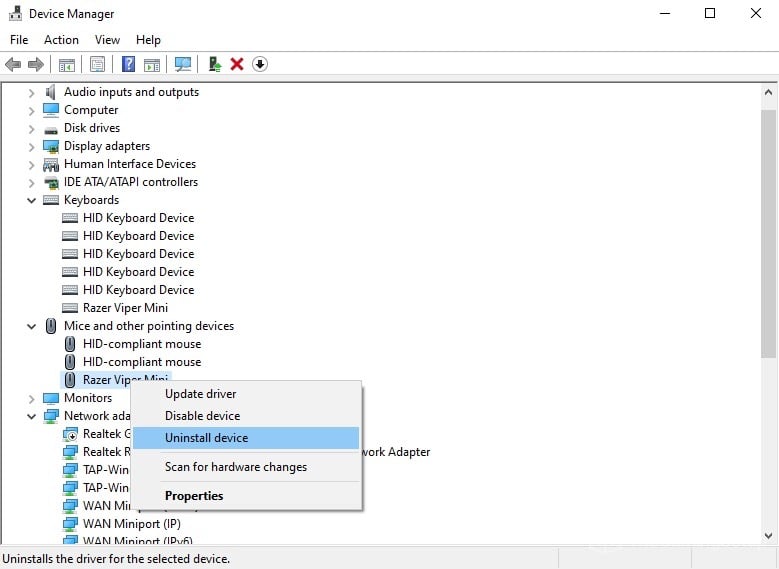
- Right-click on the start menu (or press “Win+X”) to open a pop-up menu and then select Device Manager (or press “M”).
- In the device manager, expand the “Mice and other pointing devices” section and right-click on the name of your mouse. Then click on “Uninstall Device” to remove the drivers. If you have more than one mouse showing up, keep uninstalling drivers one by one until the mouse you’re facing double-click issues with stops working.
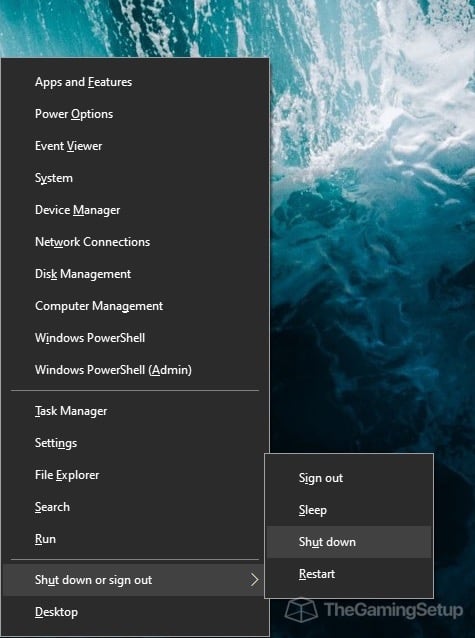
- Now you’ll have to restart your PC. The easiest way to do this without your mouse is to press “Win+X”, then “U” and then “R”. You can also use the arrow keys on your keyboard to select the “Shut down or sign out” option and then press enter after selecting “Restart” option.
After your computer restarts, Windows will have installed fresh drivers for your mouse, which should ideally fix the double-clicking issue from your mouse.
Disable USB Power Save Settings
Windows has a neat little feature that can help you reduce the power consumption of your devices that are connected via USB ports. While this is helpful, especially for laptop users, it can sometimes cause issues and glitches, such as double-clicking. Turning this off might help solve this problem
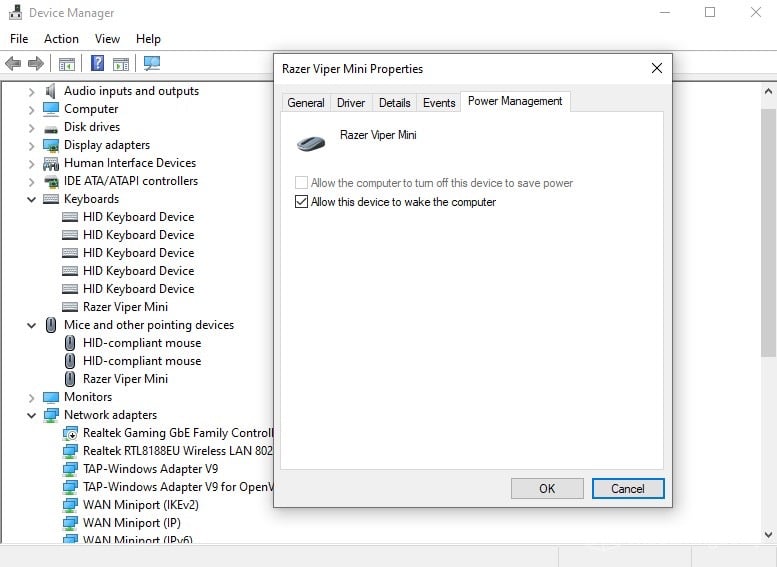
- Open the device manager (as instructed above), expand the mouse section, and right-click on your mouse. Instead of uninstalling the device, click on properties.
- In the properties menu, go into the power management tab and turn off the “Allow the computer to turn off this device” checkbox.
Increase Debounce Time
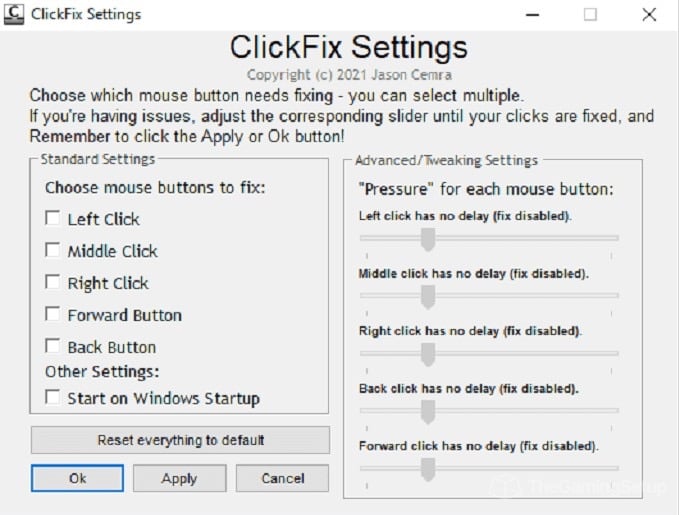
Hardware-based double-clicking can happen in any mouse that uses mechanical microswitches for its buttons. Every time you click, there is a certain degree of natural bounce, which causes multiple clicks to register. To fix this, mouse manufacturers use a debounce delay, which delays the signal until the switch stops bouncing. Naturally, this introduces a small amount of input lag.
In a new mouse, these switches are more rigid, so the preset debounce delay is enough. But in older mice that start double-clicking, their switches get bouncier and keep producing signals beyond the debounce delay time period. To fix this, you can use software that increases the debounce delay.
One of the best software for this is ClickFix, which you can download from its GitHub page. It can selectively increase the debounce delay for each individual button on your mouse. The default pressure values should be enough for most users, but if they aren’t, you can keep increasing them until the issue is gone. Keep in mind that this application will introduce further input lag to your mouse.
Clean your Mouse
A dirty mouse can cause issues due to the grime build-up interfering with the various components inside it. Try cleaning it up, both the outer shell of the mouse and its insides, and see if the double click issue persists.
Follow this simple video to clean your own mouse.

Change the Microswitches
If nothing else works and you don’t have the budget to purchase a new mouse, then you can try to replace the mouse switches inside your mouse. This can be a bit tricky and you’ll need to have a soldering kit and spare microswitches in hand before you proceed.
This video should give you an in-depth explanation of how you can go about changing the microswitches in your mouse.

Replace your Mouse
If nothing else works, and changing the switches isn’t an option, then it’s time to buy a new mouse. This isn’t a bad thing, as new and better gaming mice are always coming out and this will give you the opportunity to try that new mouse you always wanted to buy.
You can even go with a mouse that has optical microswitches. These don’t suffer from the notorious double clicking issue and their input delay is also negligible.
Mouse Double-Click Test
You can use a simple double-click test to confirm whether your mouse has fallen victim to this notorious problem.
Why Your Mouse Is Double-Clicking?
A double-clicking mouse can be due to one or more of the various reasons that can cause it.
Hardware
The most common cause of double-clicking stems from the hardware of the mouse itself.
Dirty Mouse
Dust or debris, if accumulates around the microswitches, can cause them to malfunction.
Damaged Cable
The wire that carries the signal from your mouse to your keyboard can also cause problems. If it’s damaged or cut, the signals might be sent intermittently, leading to double clicks.
Faulty Microswitch
Due to wear and tear, the microswitches used in your mouse will no longer function like they used to. The spring mechanism inside them will be worn out and will send multiple signals that last longer than the debounce delay on the mouse.
This is one of the main causes of double-click and there is no other solution to this than to replace the switches or the mouse.
Software
Occasionally, the double-clicking problem can be caused by the wrong system or mouse settings, and even bad drivers.
These can be easily fixed by either reinstalling the mouse drivers or changing the system settings to overcome the problem, as explained above.

