Choosing an Emulation Stack: EmuDeck vs RetroDeck vs Batocera vs Emulation Station
When it comes to the Steam Deck, there are multiple good options for emulating games on the handheld device. Picking the right one for you depends on a few things, such as what consoles it emulates, if you need to install ROMs or ISO files yourself and if it comes with any other features. Each emulator is slightly different. Of course, you don’t have to use any of these package options, and install emulators individually in desktop mode.
EmuDeck

EmuDeck is a package of scripts put together specifically for the Steam Deck. The result is an emulator that’s much more integrated with the Steam Deck handheld mode than any other available option. However, this does mean that installing EmuDeck on the Switch does require some security permissions for it to run correctly.
EmuDeck also comes with Steam ROM Manager to add emulated games to Steam and Deck Loader for easy plug-in downloads. Emulation Station is used as a front-end option which makes EmuDeck highly customisable. EmuDeck has seen the fastest pace of development out of all the options for SteamDeck so far.
Pros
- Most robust option
- Frequent updates
- Has multiple SteamOS interface options
Cons
- The series of scripts require some security clearance
- Having a lot of roms can make it a bit messy
RetroDeck
RetroDeck is a flatpak created for Steam Deck. Flatpaks are Linux utilities that let users install and manage different software, which makes them perfect for the Steam Deck. It acts like a platform with a range of built-in standalone emulators and removes the need to configure anything. RetroDeck is being actively developed as well, so new features are constantly being added.
Pros
- Packages all emulators in one install
- Clean Flatpak install
- Tidy separated instance you can launch from SteamOS
Cons
- Harder to tweak individual emulator settings
Batocera

Batocera is a separate Linux OS dedicated to emulation, which means accessing it requires a completely separate boot. This makes it a little more complicated than the other options on this list. But it also keeps your SteamOS clean from emulation if that’s what you want. Batocera is more designed for a dedicated box like a Raspberry PI, but it’s a solid option if you’re looking for a self contained emulation boot for your Steam Deck.
Pros
- Installs to the microSD as a completely separate boot
Cons
- Annoying if you’re going back and forth between SteamOS
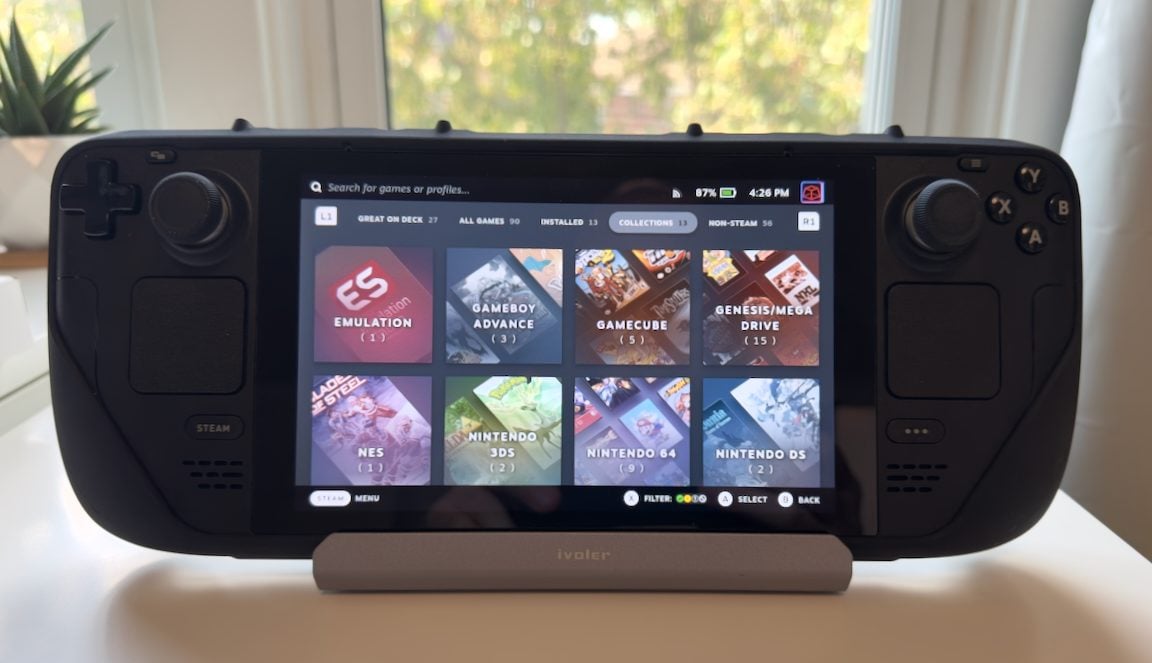
Emulation Station

Emulation Station is the front-end for many emulators, including the RetroPie Project, which turns the Raspberry Pi into a retro gaming console. It’s easy to see why this software is so popular across devices.
The desktop version of Emulation Station runs very well on the Steam Deck thanks to its relatively easy set-up (for an emulator on Steam Deck). It supports over 130 game systems and includes an interface that works with any 4-button controller. The downside is that each emulator needs to be manually configured, which can take a while. It’s still being actively developed.
Pros
- Integrates well with SteamOS
- Not as simple to set up as EmuDeck or RetroDeck
Cons
- Emulators need to be manually configured for controllers
The best emulator setup on Steam Deck: EmuDeck
While there are many great emulator options for the Steam Deck, only one can be crowned the best emulator on Steam Deck. Currently, that title goes to the EmuDeck. EmuDeck is built specifically for the Steam Deck and uses Emulation Station for its front-end for additional optional benefits.
When using Emulation Station through EmuDeck, you get the best of both worlds so that you can play all your emulated games through a single program for ease of use. EmuDeck will also work with other software, such as the Steam Rom Manager, to import your roms into SteamOS directly and categorise them for you so that it looks native. The flexibility the EmuDeck provides, its features, the number of game systems it covers, and its ease of use make it the best emulator on Steam Deck.
Setting up EmuDeck
Emulators available on EmuDeck
EmuDeck includes a wide range of built-in emulators, so there’s no need to install anything else unless you want to use a specific emulator. Here’s a full list of all the emulators available on EmuDeck:
- Cemu (Wii U)
- Citra (3DS)
- Decky Loader
- Dolphin (Gamecube and Wii)
- Duckstation (PSX)
- EmulationStation-DE
- MAME (Arcade Systems)
- melonDS (Nintendo DS)
- mGBA (Gameboy, Gameboy Color, and Gameboy Advance)
- PCSX2-QT (PS2)
- RPCS3 (PS3)
- PPPSSPP (PSP)
- Primehack (Metroid Prime Trilogy)
- RetroArch (Retro Systems)
- Rosalie’s Mupen GUI AKA RMG ( Nintendo 64)
- Ryujinx (Nintendo Switch)
- ScummVM (Point and Click Adventures)
- Steam ROM Manager
- Vita3K (PSVita)
- Xemu ([Original] Xbox)
- Xenia (Xbox 360)
- Yuzu (Nintendo Switch)
Tools needed
To install EmuDeck on a Steam Deck, you will need:
- Keyboard and Mouse (heavily recommended for ease of use)
- An SD card (unless you want to use your Steam Deck storage space)
- Internet connection
And the Steam Deck, of course! After installing, you’ll need each relevant BIOS along with the game ROMS/ISO files, but these are not needed to install EmuDeck. They will be needed to start playing emulated games after installation.
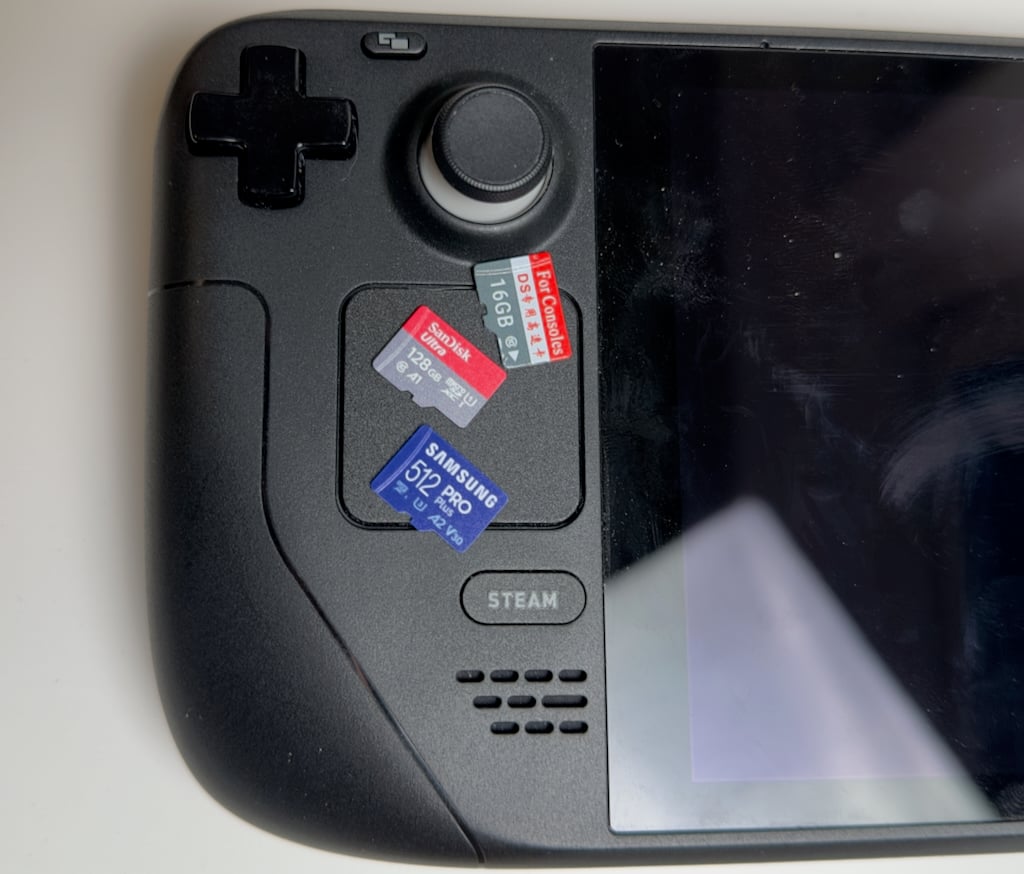
How to format an SD Card for Steam Deck
If possible, you should save EmuDeck, the games and your BIOS to an SD Card to save space on your Steam Deck. It’s easy to lose track of how much storage space emulated games and emulators take up, which eats into your SSD for modern games. Steam Deck wants SD cards to be in the ext4 format, which is Linux-friendly since SteamOS is based on Linux. This is the easiest way to format your SD card:
- Put the microSD card into the Steam Deck
Plug it into the slot at the bottom below the right corner of the screen. It needs to go in face up, and you might need something thin such as a fingernail to click it into place.
- Reformat the SD card
This takes a few clicks, but it’s very simple.
- Press the Steam button
- Go to Settings, then System
- Find the System Settings
- Look for Format SD Card, then hit Format
After a few minutes of formatting, the SD Card will be Steam Deck compatible and ready for you to use.
Note: Doing this will erase all data on the SD Card, and Steam Deck will alert you to this when trying to format it.
Once the SD Card is in place, Steam will give you the option of saving games to the internal drive of the MicroSD Card. You could also set the SD card to be the default storage option if you wish.
How to install EmuDeck
To install EmuDeck on your Steam Deck, you will need a stable internet connection while getting it all setup.
1. Switch to Desktop Mode
To change the Steam Deck to Desktop Mode, you need to bring up the menu.
- Press the Steam button
- Scroll down the options to Power
- Select Switch to Desktop Mode
You can also hold down the power button to bring up this menu.
2. Download EmuDeck
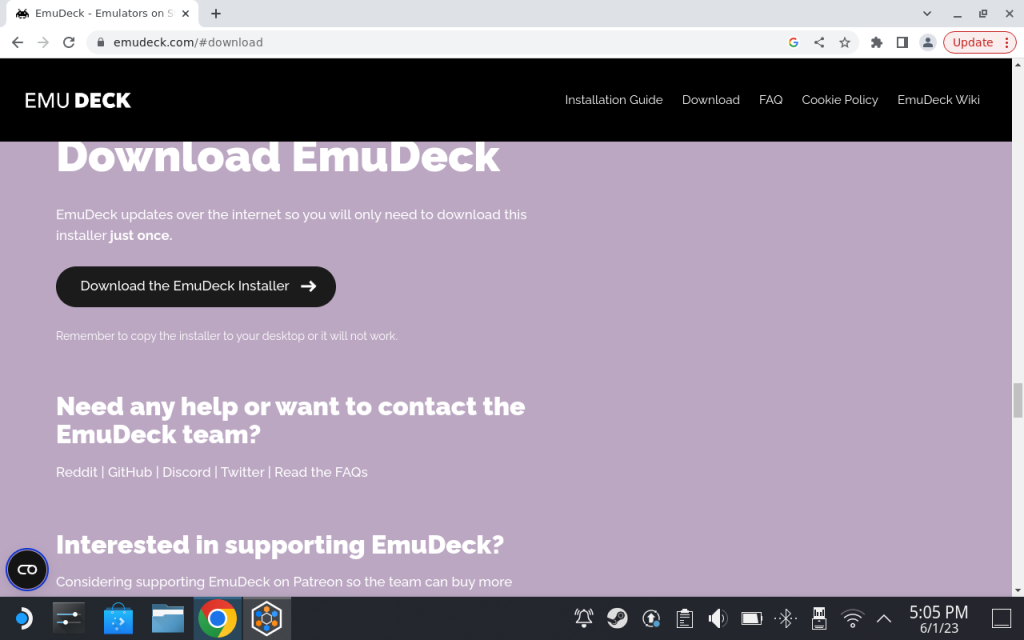
Launch an internet browser and go to the EmuDeck website to download the EmuDeck installer. The file is small, so it should install quickly.
3. Install EmuDeck
After downloading the file, you need to install it.
- Move the EmuDeck desktop file to your desktop
- Double-click the file to launch it
- Wait for it to process
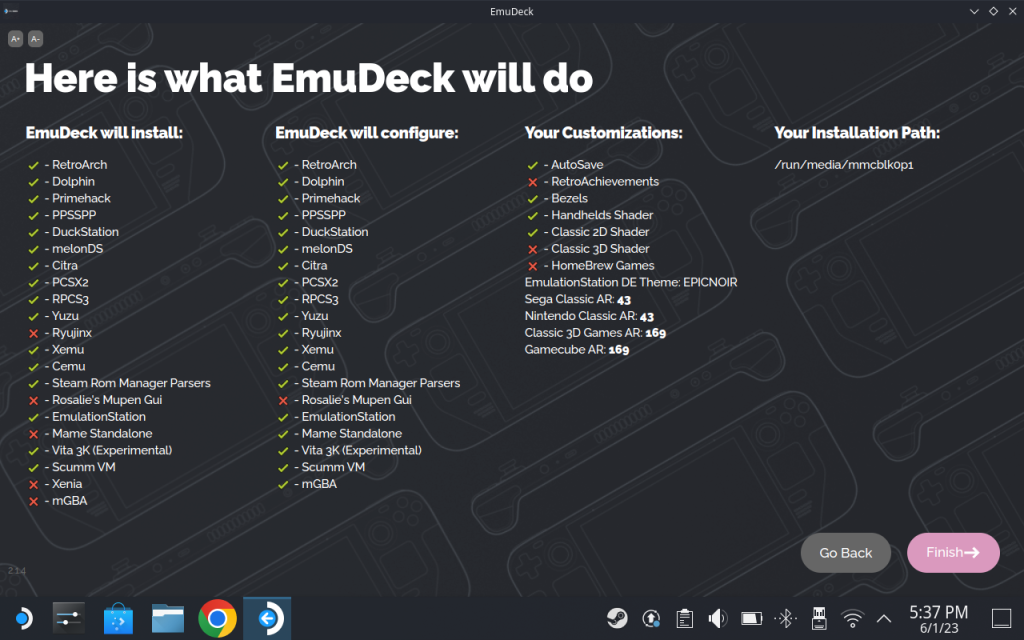
- Choose one of the options: easy or custom
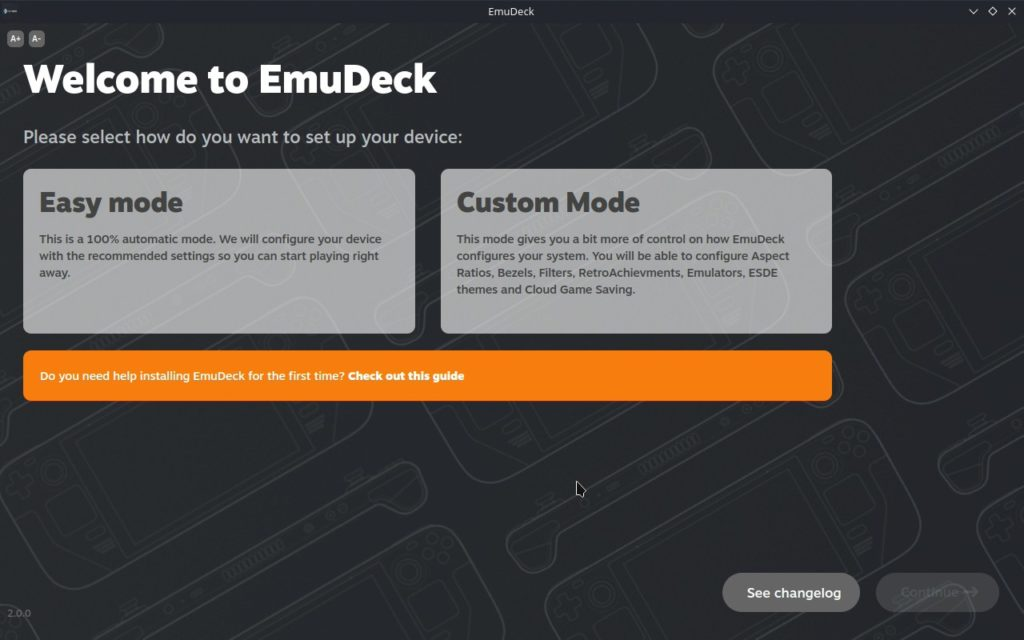
Easy mode does the standard config for EmuDeck and is a good option for those who want to get gaming quickly.
I suggest you go Custom Mode, you will be able to configure the options before it installs, including which emulators you want and where EmuDeck will be saved. This isn’t essential, but it’s best to save EmuDeck to an SD card to avoid taking up space on your Steam Deck.
How to Find and Install BIOS Files
Not all game systems need you to install the BIOS because some emulators will have it built into them. However, some BIOS are still copyrighted, so emulators might not contain them. Some emulators might come with a modified BIOS that doesn’t have the copyrighted code, but these might come with compatibility issues.
Finding BIOS files
Since the missing BIOS files contain copyrighted code, it’s tricky to find a safe copy sharing them is illegal. It is possible to find BIOS lists online in emulator communities such as Reddit or Discord, and users can point you in the correct direction. Due to the BIOS files containing copyrighted material, we can’t share direct links on this website.
Installing BIOS Files
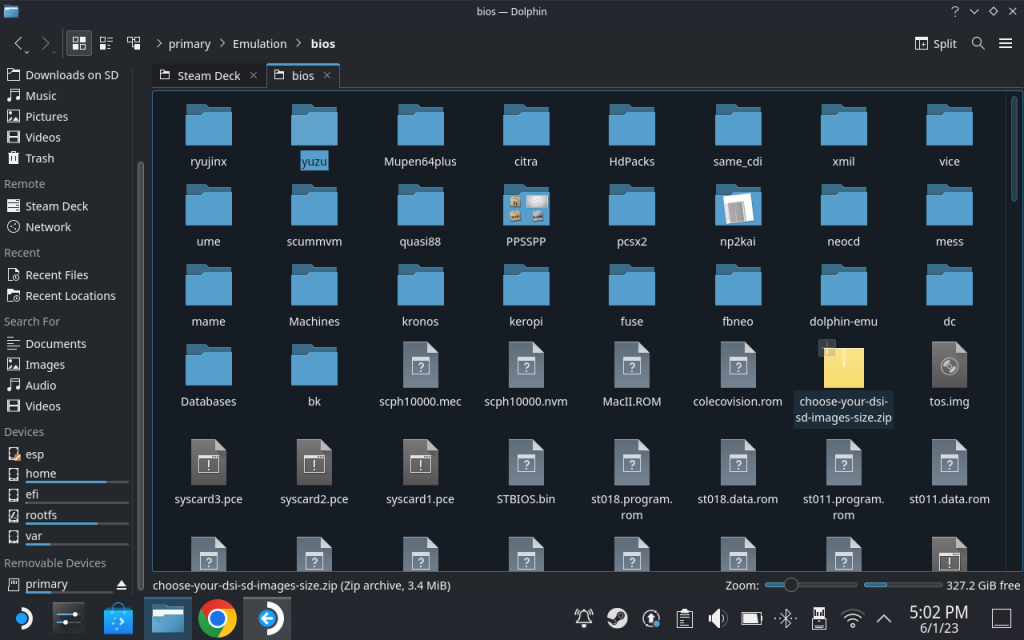
If you installed EmuDeck on a microSD card, the bios directory is:
Primary/Emulation/bios/
If you installed EmuDeck on internal storage, the directory is:
/home/deck/Emulation/bios/
Once you’ve downloaded the BIOS files and placed them on a USB stick, you’re ready to install them on the Steam Deck. This process also works if you decide to install them directly to the Steam Deck or use another installation method.
- Move the BIOS files onto the Steam Deck
You want to place the files into the correct location for EmuDeck to access them. This depends on where you have the emulator installed.
- Put the BIOS files into the bios folder within the Emulation folder
The BIOS files need to be placed into the system it’s for, assuming there’s a system folder already there. While EmuDeck does include emulators for a huge range of systems, the new consoles might not have a systems folder which makes it a little more tricky.
- If there is a named system folder within the bios folder for that console, place the BIOS file there.
- If there is not a dedicated folder for that game system, just place the BIOS file into the root bios folder.
There is a readme file in each folder that explains this fully. We recommend reading the readme files before installing BIOS files in different locations. While unlikely, it’s possible that a later update might make this guide incorrect.
Do not unzip the BIOS file.
After placing the BIOS file, EmuDeck has a handy bios checker to see if it can detect the BIOS properly. The EmuDeck readme page contains some additional information about what BIOS files you’ll need.
How to Install ROMS
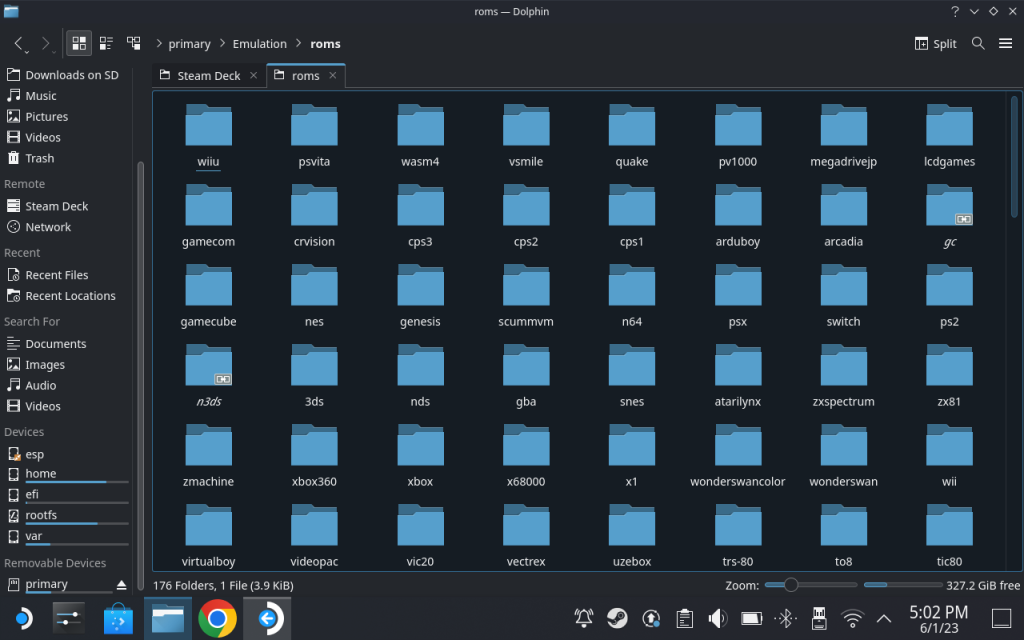
If you installed on MicroSD the directory is:
Primary/Emulation/roms/
If you installed EmuDeck on internal storage, the directory is:
/home/deck/Emulation/roms/
Installing the game files is simple once you’ve downloaded the ones you want. This can be done on a web browser through the internet on the Steam Deck, or you could download them on a PC and then move them to a USB.
EmuDeck adds blank folders named after each supported console during its installation. This means all you need to do is move the ROM or ISO files to the correctly named folder.
To do this:
- Open the File Manager
- Find the place you installed EmuDeck (the internal HDD or SD Card)
- Go to Emulation, then to roms
- Put the game ROMS in the correct folder
How to Configure Gyro and Touch Controls
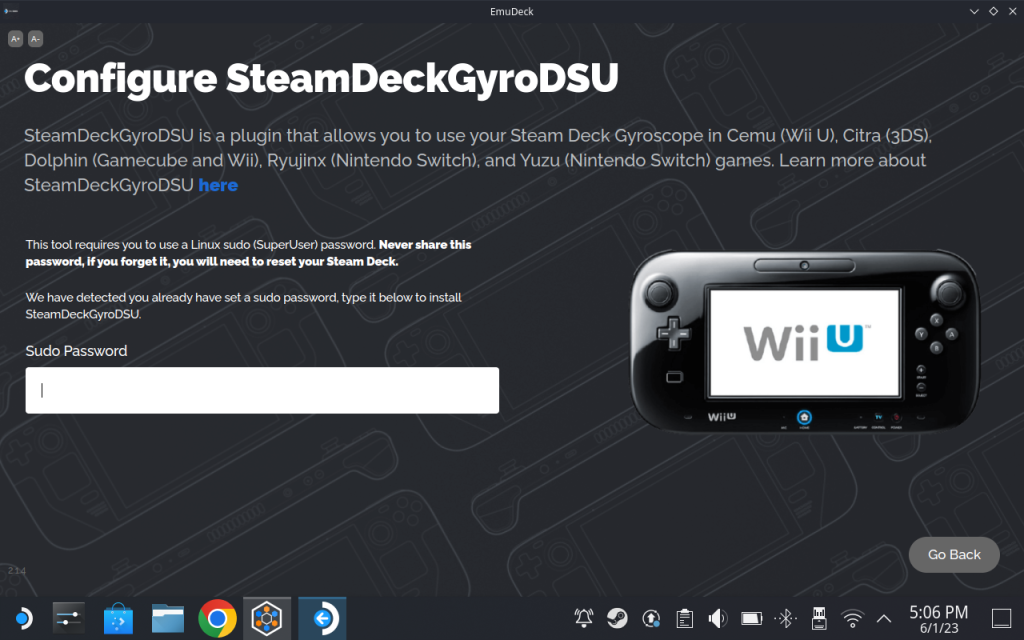
While not essential for most emulator gamers, these are important for many Nintendo consoles, including the 3DS, Nintendo Switch and Wii U games. The Steam Deck also allows you to keep the gyro and touch controls that Switch owners love and add them to PC games. You will need to install SteamDeckGyruDSU in EmuDeck, requiring your sudo admin password to install.
Configure Gyro on Steam Deck
Doing this with EmuDeck is easy once you’ve added the emulated games to your Steam library.
- Find the game you want to configure gyro controls for
- Select the Controller icon
- Change the Gyro Behaviour option to whatever you want
It’s also worth calibrating the gyro controls for the Steam Deck if you haven’t done this yet. This will improve your overall gaming experience with emulated games and other games too. All you need to do is:
- Press the Steam Button
- Go to Settings and scroll down to Controller
- Click the Calibration & Advanced Settings, then select Open
- Follow the instructions
Configure Touch Controls
The instructions for configuring the native Steam Deck touch controls can vary depending on the emulator and how you’re running your games.
If you’re playing Nintendo DS games through MelonDS via RetroArch, which is running through Emudeck, then this simple solution should help:
- Go into the RetroArch options
- Change Touch Mode from Mouse to Touch
Switching the layout to the top/bottom or left/right should also fix any touchscreen inputs that remain. Some of the layouts have issues with the touch inputs, and some layout tweaks should fix it.
How to enable Native Touchscreen Support
If the above solution doesn’t work for you, this one should. This is the solution used for native Steam Deck games, and there have been positive reports about it working for emulated games too. It was originally posted to the Steam Deck subreddit about Civilization VI, but it works for pretty much everything else too.
- Go to the game controller settings and edit
- Select Action Sets, then click the cog wheel next to the In-Game Controls
- Add Always-On command and click Add Command
- Go to the Systems Tab
- Click the Touchscreen Native Support
After this, you need to enable the touchscreen setting in the game options.
- Open Settings
- Go to the Interface
- Check the Touch Input Enabled box
This needs to be done in the exact order listed above, or it won’t work.
Updating emulators
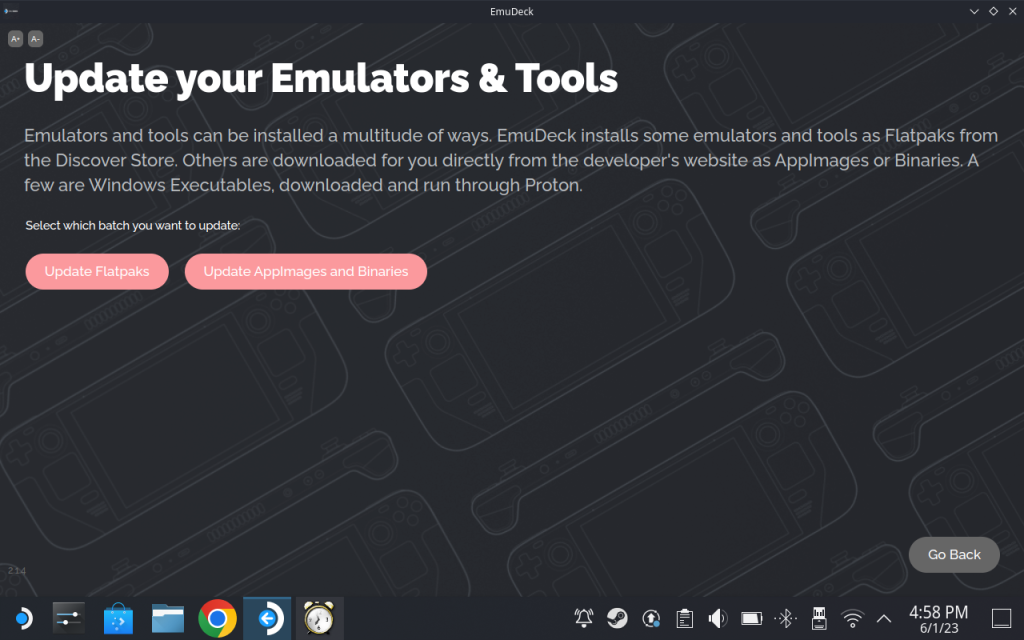
While some emulators need you to download and install updates manually, Emudeck does this automatically. Emudeck will check for updates, download and install them for you when you try to launch the app from the Steam Deck desktop. Updates may reset your configs. Other emulators may require you to check for updates yourself, download then install the latest version.
Steam Rom Manager: Emulation in Gaming Mode
Playing emulated games on Steam Deck while in Gaming mode is a walk in the park; it should work straight out of the box, especially if you’re using EmuDeck.
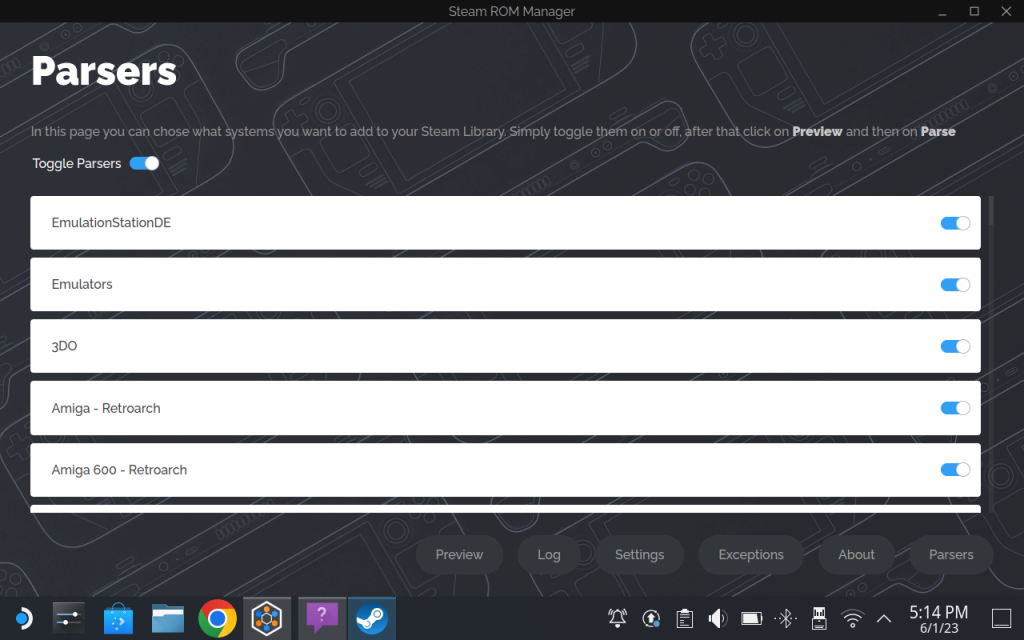
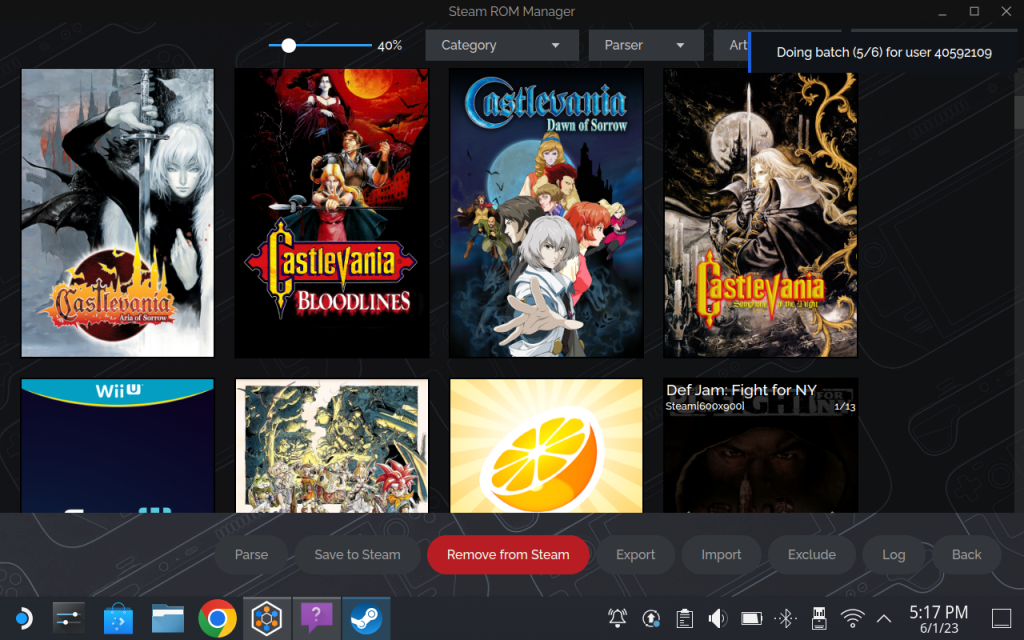
The EmuDeck installer has an option to include Steam Rom Manager, I highly suggest you install it. Then, to get emulated games in your SteamOS Handheld mode:
- Launch Steam Rom Manager
- Select which systems you would like to parse
- Click Preview, then Parse on the bottom left
- Then hit Save to Steam, the app will start setting up your games in SteamOS
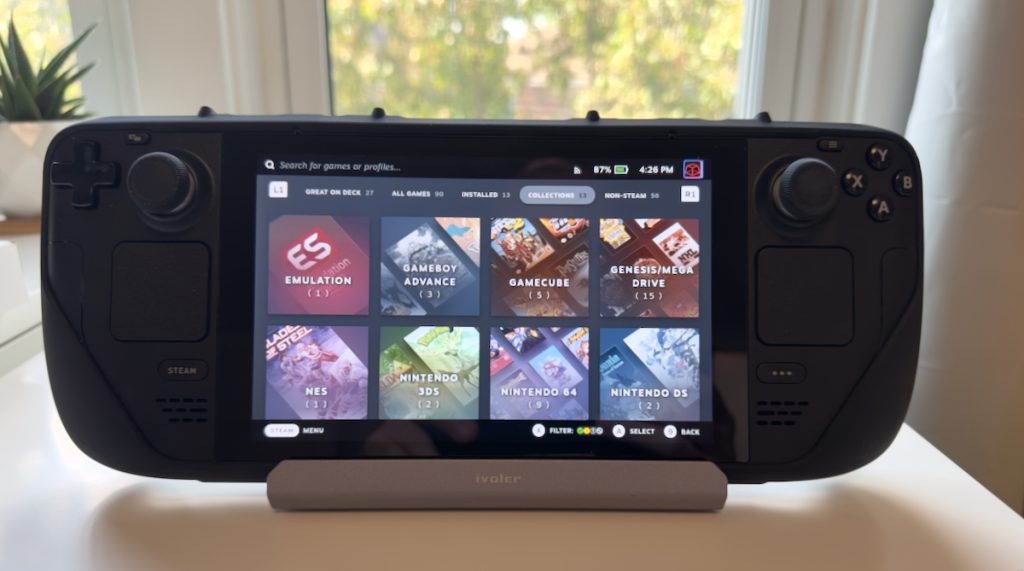
You can now launch emulated games directly from Steam. The emulated games will be listed as non-Steam games in your library, so it might not be immediately obvious.
Potential Issues with Gaming Mode and Emulation
However, some emulated games might not run as smoothly in Gaming Mode. Emulated games usually run better in the Desktop Mode, and this was fully explained on the Steam Deck subreddit.
Running them in the Gaming Mode might make the game run slower than expected and seem “sluggish” in comparison. In short, Desktop Mode gives emulated games a better framerate as it’s more efficient.
There are potential solutions for this, but it seems inconsistent. Some users find that using an alternative emulator (installed by EmuDeck) solves the problems, while others find that removing the Steam UI 30fps frame limiter fixes it.
Decky Loader does include some optional plugins that might solve this issue, such as PowerTools and CryoUtilities.
PowerTools allows you to disable 4 cores during Gaming Mode, replicating the performance of Desktop Mode. This will improve the overall performance of emulated games, especially for older games.
However, the cores do need to be enabled for non-emulated titles to run at full power. There is no single solution, so you may need to try multiple options to find one that works for you.
Performance tweaks with CryoUtilities and PowerTools
Steam Deck performance is pretty good, but it’s not perfect. Naturally, users decided to create their own fixes. The CryoUtilities and PowerTools apps are two of the best third-party options that can boost your Steam Deck gaming performance. Both of these tools can be installed with the EmuDeck installer now. They aren’t essential to use or install, but they might help improve your emulated game experience.
CryoUtilities
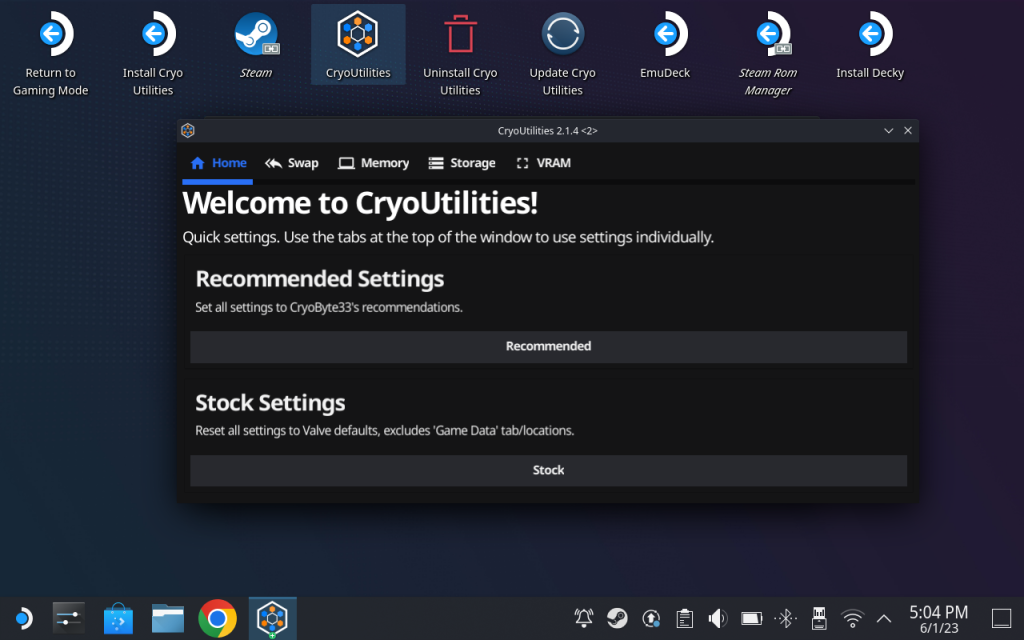
Created by Cryobyte33, CryoUtilities is a performance tool designed to save storage space and boost overall performance. It allows you to alter the “swap file” on Linux, which Steam Deck sets aside for when RAM is overloaded. However, some games will never utilize the hardware properly, but CryoUtilities fixes this issue.
It gives you more control over the performance of the Steam Deck with options that let you shrink the swap file size and how much your device relies on it. This allows games to run better, boosts Steam Deck performance and gives you a better gaming experience.
CryoUtilities is easy to install and worth keeping even if you don’t notice an immediate improvement. Tools like this will help your Steam Deck have a long, happy life.
PowerTools
The PowerTools plugin gives you more control over the Steam Deck’s power consumption and GPU. This tool allows you to optimise your settings so that games run better. It’s considered an essential tool for anyone emulating games or playing Steam games not on the supported list for Steam Deck.
PowerTools mostly requires trial-and-error to find the correct settings over a few gaming sessions. It allows you to adjust the CPU, GPU, disable SMT and make a few other adjustments from a software level. While PowerTools is unlikely to harm your Steam Deck, making some adjustments might worsen the issue if it already has hardware issues.
Installing PowerTools via Decky Loader is considered to be a tweaking essential. It allows you to disable the 4 CPU cores during Gaming Mode, causing the Steam Deck to replicate the Desktop Mode, which is better for playing emulated games. Placing more limits is simple with this plugin and will improve performance.
Emulator Control references
Basic EmuDeck Controls
- Exit a Game (Normal)– Press SELECT + START at the same time
- Exit a Game (Force Close) – Press the Steam button and select Exit Game
- Enter RetroArch Menu – Press L3 + R3 (press on both joysticks)
- Many emulators run from RetroArch so this is a useful hotkey to remember.
- Insert Arcade Credit – Press SELECT when in an Arcade game
- Start Arcade Game – Press START to begin a 1 player game
In addition to the above, here are the Emulation Station hotkeys.
Emulator Hotkeys
EmuDeck controller layouts will vary slightly according to the emulator you want to start playing games from. Here’s a full list of where to find the hotkeys for each emulator:
- RetroArch (Retro Systems)
- Dolphin (Gamecube and Wii)
- Primehack (Metroid Prime Trilogy)
- Citra (3DS)
- Cemu (Wii U)
- Rosalie’s Mupen GUI AKA RMG (Nintendo 64)
- mGBA (Gameboy, Gameboy Color, and Gameboy Advance)
- melonDS (Nintendo DS)
- Yuzu (Nintendo Switch)
- Ryujinx (Nintendo Switch)
- PPPSSPP (PSP)
- Duckstation (PlayStation)
- PCSX2-QT (PlayStation 2)
- MAME (Arcade Systems)
Note: The following emulators do not currently have a hotkey list available, but configuration help files can be found here.
If you need more help, the EmuDeck Wiki is great.
Emulation basics
What is an emulator
An emulator lets you play video games from a completely different console on your platform. The emulator allows your computer to imitate another device so that a console-exclusive game can work on your computer.
This ‘tricks’ the game into running, enabling you to play games you otherwise wouldn’t be able to. Once the emulator installation is complete, you need the game ROM and console BIOS. Here are a few important emulator facts:
- Emulators are legal (however, there may be laws in your region about how you use game ROMs)
- Not all platforms support the use of emulators (they go against the Xbox ToS, which could get your account banned)
- Sharing copyrighted ROMs and BIOS is illegal
What is a ROM?
ROM is short for Read-only memory, which can mean many things, but for video game emulation, the ROM is the digital video game file. If you want to emulate a game on another device it wasn’t released for, you’ll need the ROM. The ROM file must be harvested using special hardware to download the data from the cartridge to a computer. However, this is only for cartridge games like the NES or GameBoy.
ISO Files
Consoles that use discs like the PlayStation 2 can still be emulated, but these games are available as an ISO image. They’re ripped from the disc using an optical drive, but the ISO file won’t immediately be able to run. Windows 10 and 11 have ISO mounting built into them, which lets you create a virtual drive and run the game from that file without needing the disc.
While emulators are perfectly legal, ROM and ISO downloads and sharing probably isn’t legal in your region. However, the emulation scene is considered too big for companies to chase after, and they seem to be allowing it to exist. Keep in mind that your ISP might still be unhappy if you download ROM or ISO files.
What is a BIOS?
BIOS (Basic Input Output System) is the firmware responsible for loading everything for a console system, such as hardware settings. The console BIOS also provides services for the operating system, which allows the device to function. Without a BIOS, the console will not work.
Emulators also need a copy of the BIOS of the original console to run the games from that console. While some emulators will come with a copy of the BIOS, most will not. This is due to legal issues.
The emulation scene is strong, and it’s easy to find copies of console BIOS online to download and use to play emulated games. Like with ROM files, the BIOS software is usually copyrighted, making it illegal to share it without the copyright holder’s permission. Your ISP will likely not approve downloading these files, so a good VPN may be needed.
Is emulating games on Steam Deck legal?
Yes. Emulating games on Steam Deck is legal. There are no ToS or user conditions that ban the use of emulators on the Steam Deck. Valve will not ban your account for using an emulator on the device.
In most regions, downloading copyrighted ROMS, ISO files, and BIOS is not legal. Neither is sharing the files. This is why we can’t provide you with links to these files though they are pretty easy to find online. The video game emulation scene is very big, and it currently looks like companies have no intention of chasing after people emulating games.
Websites sourcing ROMs have been asked to close, such as EmuParadise, in 2018, where Nintendo sent a cease-and-desist letter to scrub all Nintendo ROM downloads from the site. However, this was due to the copyrighted ROMs and not emulator software. Emulators are legal, and Sony even lost in court back in 2000 when it took Bleem! to court over copyright violations.
FAQ
Can Steam Deck emulate the Switch?
Yes! Steam Deck is perfect for emulating the Switch due to its built-in gyro and touch controls, similar to the Nintendo Switch console.
Multiple emulators are capable of emulating the Switch on the Steam Deck. EmuDeck comes with Yuzu and Ryujinx, which are specialised for emulating the Switch.
Can Steam Deck emulate PS2/PS3?
Yes! The Steam Deck can run emulators for a wide variety of consoles, including some that target PlayStation consoles. Almost the entire PlayStation range is accessible on the Steam Deck via EmuDeck.
EmuDeck comes with PCSX2-QT for PS2 and RPCS3 for PS3 games. It also includes Duckstation for the original PlayStation console, PPPSSPP for the PSP, and Vita3K for PS Vita.