
Stick drift has been cursing gamers for decades. If you regularly use gaming controllers, you will be all too familiar with drift.
Here are a bunch of ways to potentially remove the drift for all types of controllers. They’re not guaranteed to work, and some of these tips are sort of universal, but they’re worth a shot for sure. Use the table of contents to jump to the controller you’re interested in.
How to fix stick drift for the PS5 DualSense
Here are 6 things to try when trying to fix your Playstation 5 controller.
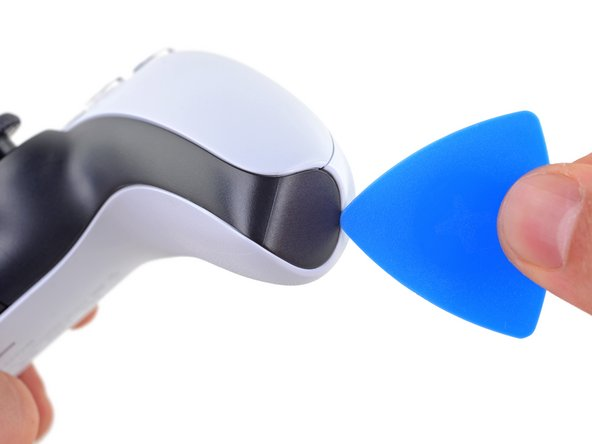
1. Clean the PS5 joysticks
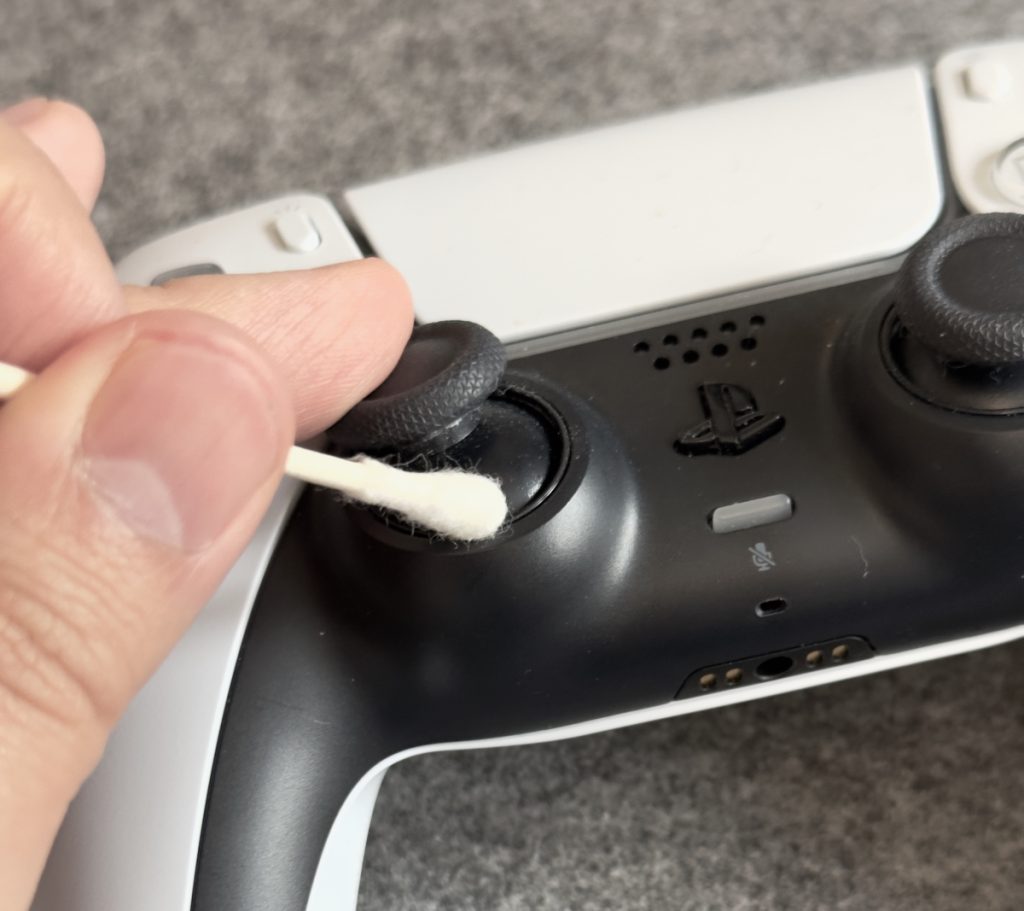
Dirt and dust falling into the joystick box may be the cause of your drifting. There are a couple of ways to clean your joysticks to fix drifting. It’s not guaranteed to fix drifting, but I’ve managed to get rid of drifting for some period of time on some of my controllers doing this.
- Press down on your joysticks 10 times, rotate 10 times and lift the sticks 10 times to dislodge any dust from the stick box.
- Use compressed air and blow out any dust and dirt lodged
- Use isopropyl alcohol and a cotton swab to try and break down any dirt build up
- Use a small amount of rubbing alcohol
- Wiggle the stick back and forth to work in the alcohol
- After drying, use the compressed air again
- Let everything dry
2. Reset your DualSense controller

Doing so will disconnect your controller from the PS5 and reconnect it with factory settings, which might eliminate drift in some cases.
- Turn off your PS5.
- Take a paperclip or a sim ejection tool and press and hold the tiny button on the back of your DualSense controller for 5 seconds.
- Turn on your console again and reconnect the controller with a cable.
3. Update the DualSense controller software
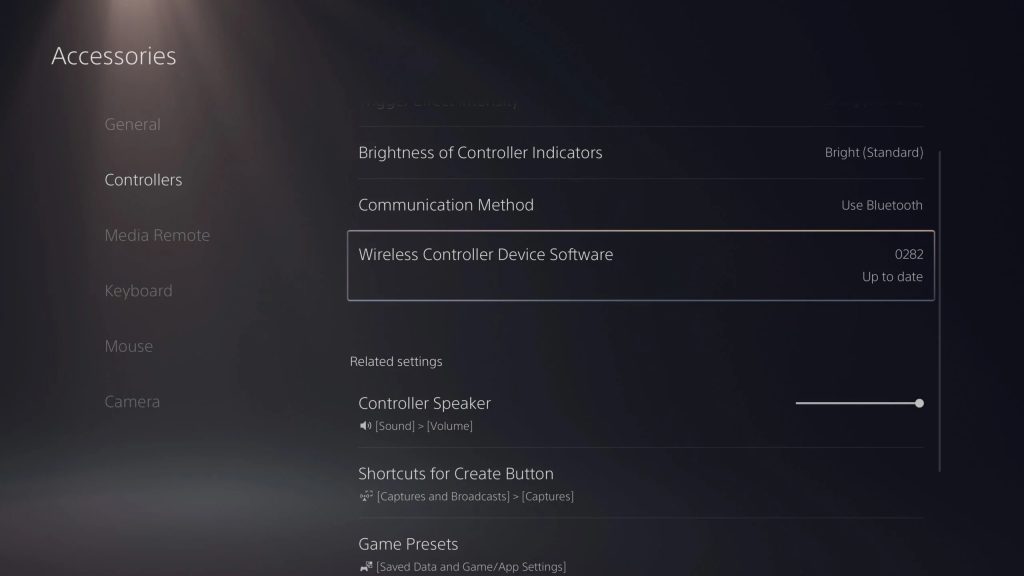
It’s not likely but outdated controller firmware can in some case be the culprit behind the developing of drift. To update, connect the DualSense controller to the PS5 using a USB cable, then press the PlayStation button and open the Accessories menu. Navigate to the Wireless Controller Device Software section. If your controller is up to date, you will see it here. If not, the console will automatically update your controller when it’s connected via cable. You can manually update it from this screen as well.
As a side note, make sure you keep your PS5 on its latest firmware as well. On the home screen, open Settings, System, System Software, System Software Update, and Settings. Here, select the Update System Software tab, and select either using Wi-Fi or USB.
4. Adjust the deadzone threshold
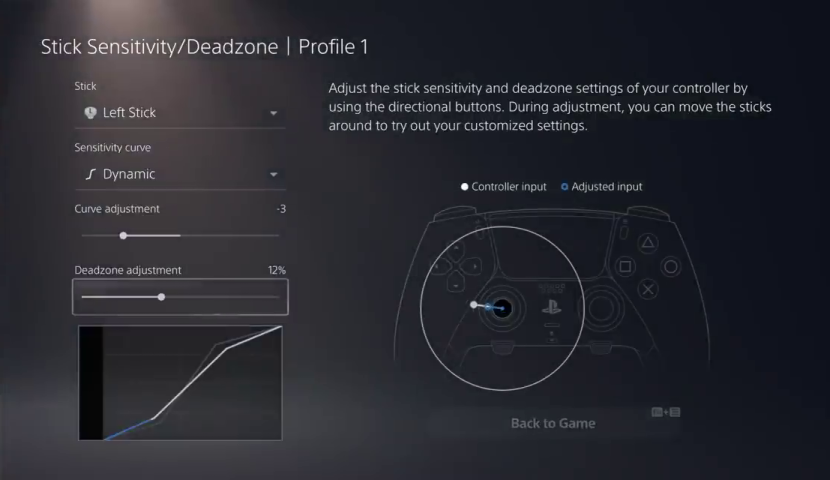
This isn’t really a fix, but a workaround. This is much more subjective based on the game you are playing. If your controller is drifting, you can adjust its input threshold. This ensures that it does not reach the ranges of motion where drift becomes apparent. Unfortunately, the Dualsense doesn’t have a built-in setting to adjust the deadzone of the controller. So you will be at the mercy of the games that do offer it. The Dualsense Edge however does have deadzone adjustment.
5. Do a warranty return
If your PS5 controller is under a year old since purchase, you can get in touch with Sony for an exchange. Head over to Sony Hardware & Repairs to start a warranty claim.
6. Replace the joystick module
If all else fales, you can replace the sticks on a DualSense. The joysticks used on it are the same as the DualShock 4’s, and you can find plenty of replacement sticks online. The replacement process is quite difficult though, you can the steps on ifixit. The Dualsense Edge has tool-less replacement joystick modules that make replacing drifting sticks easy.
How to fix Nintendo Joy-Con drift
If you own a Nintendo Switch, you already know how bad the Joy-Con controllers are. With only a thin film of soft plastic standing between dust and its delicate internals, it’s very prone to developing drift early on in its life. Try these 4 things to fix your Nintendo controller.
1. Clean your joystick
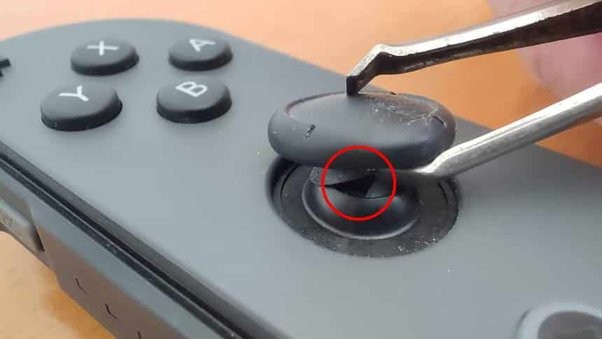
These cleaning steps are similar to other controllers, but the Joy-cons have some quirks to them.
- Click, lift and rotate your controller 10 times to dislodge any dust
- The Joy-con stick has a little plastic sheath covering the stick, lift the sheath and you can get some canned air and spray to dislodge any particles from the sensor.
- While keeping the sheath lifted, you a cotton swab with rubbing alcohol to clear up any stinky residue in there.
- Let the controller dry
2. Try calibrating your controller
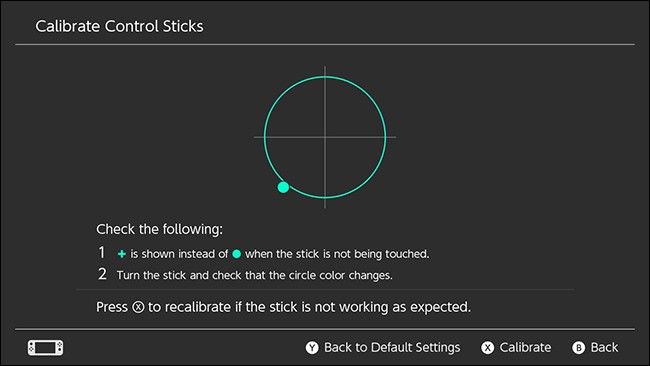
The neutral point of a controller is its resting position where it does not register any movement. You can also make use of the calibration feature on some Switch games to make sure any inputs caused by drift aren’t registered. To start a calibration:
- Remove your Joy-cons from the switch
- Go to System Settings
- Select Controllers and Sensors
- Then hit Calibrate Control Sticks
- Then follow the instructions on the screen
3. Send it to Nintendo to repair
Nintendo may or may not be able to repair your joysticks for free, check through their support site to see.
4. Replace joystick modules
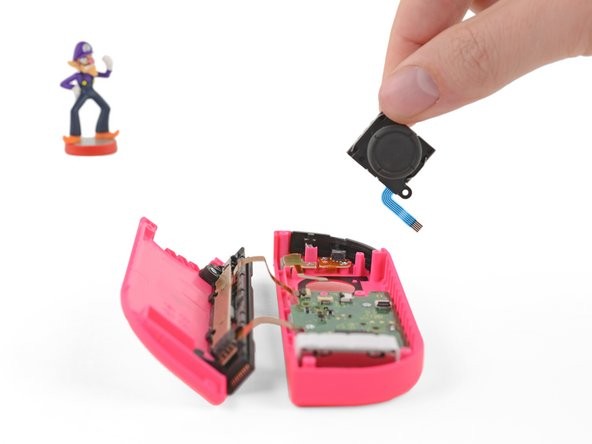
There are also replacement joysticks available for the Joy-Cons. I’ve managed to swap out a stick module and I’m not the lightest touch when it comes to repairs. iFixit and GuliKit offer both analog and Hall effect joysticks for the fraction of the cost of a brand new pair of controllers.
Hall effect joysticks are far superior to analog ones as they are much less likely to develop drift over time. They are a bit more expensive than analog sticks, but well worth it in the long run.
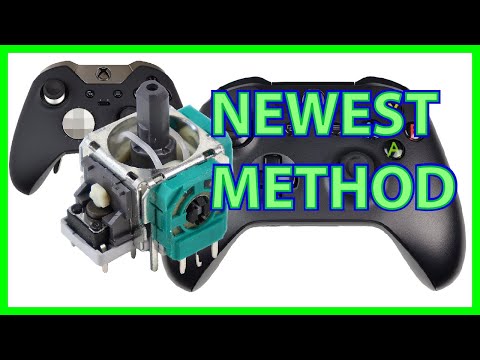
How to fix Xbox controller drift
1. Clean the joy stick

Cleaning the Xbox controller has a pretty standard set of steps.
- First, turn off the Xbox controller and remove its batteries (this is important!).
- Rotate the joystick, click down and lift the stick up, 10 times each.
- Hit the controller with some compressed air to remove even more gunk.
- Next, apply some isopropyl alcohol to a cotton swab. Use this to wipe around the base of your joysticks, wipe thoroughly and carefully, and really get it in there.
- Let the controller dry, overnight just to be safe.
2. Adjust the deadzone
Only available for Elite controllers, you can adjust the deadzone under controller settings. Unfortunately, non-Elite controllers are out of luck, you’ll have to rely on adjust in-game deadzone settings, if they exist.
3. Warranty return
4. Replace the joystick module
What causes a controller to drift?
The overall build quality of controllers vary from brand to brand. Some are much more prone to developing drift in a shorter timeframe than others (cough Joy-Cons cough). So the way drift develops is the same for all controllers. The main natural cause for controller drift is wear and tear of the sensors over time. The second cause is dirt and debris. Things like food particles, pet fur, and dead skin can accumulate inside your controller and cause it to drift.
Newer controllers aren’t built to last
According to iFixit, newer generations of controllers have a shortened lifespan to entice you into replacing them more frequently. For instance, the PlayStation 5’s DualSense controller and the Nintendo Joy-Cons are famous for being weaker than their predecessors.
How to prevent stick drift
There’s no way to completely eliminate the risk of controller drift. It’s part of a controller’s life cycle, and it will always happen at some point. But that’s not to say that you can’t prolong it. By being careful and taking some extra measures, you can give your controller a little bit more life in the tank. Below are some basic steps you can take to prevent drift from developing for any type of controller.
Keep your controller clean and dust free
You can prolong a controller’s life by minimizing the amount of dust and other particles that make their way inside. Here are some tips to keep the debris away:
- Do not store your controller in dusty environments. If your controller remains unused for extended periods of time, make sure it’s not lying on a shelf somewhere gathering dust. Passively exposing your controller to the environment is one of the worst things you could do to it.
- Clean your hands before using the controller. Wipe away any Cheeto dust before putting your hands on it.
- Store your controller in an unexposed, cool, and dry place. A clean drawer or a case is a great way to store your controller.
Go easy on your controller
Ultimately there’s only so much you can do to prevent the environment from causing your controller to drift. The rest is up to you. Tossing your controller around, chucking it in a bag when you go out, or simply throwing it on the floor when you get sniped for the fifth time in a row is generally not considered proper controller etiquette. Try not to flick your sticks too aggressively or often.
Don’t mash your thumbsticks
Try to press down on your thumb sticks less. First-person shooters in particular have actions bound to the L3 or R3 buttons that require you to press down on your joysticks, but this is one of the worst things you can do to their longevity. Try remapping these to a different button, or get yourself a controller with dedicated back buttons.
Controllers will wear out
It’s the circle of life (for a controller, at least). This means that a day will come when you will have to reluctantly throw your trusty controller into the recycling bin. But by following the tips I mentioned above, you can make sure that day will take a very long time to come


3 Responses
My controller’s left joystick is drifting and I can’t find a way to fix it.
If you’ve tried everything in this post, might be time to get a new controller unfortunately 🙁
Just mess around with it and make sure to get the batteries out first